

- One anchor, every shot: on a recurve or longbow, learn the corner of the mouth first; a sighted recurve anchors under the chin.
- Press in firmly, hard enough to feel bone, because a soft anchor drifts while you aim.
- Add a second reference, like the string touching the tip of your nose, so you can feel when one point is off.
- Arrows spreading up and down usually mean a moving anchor; build it on a blank bale at about 3 yards.
- If you can’t reach your anchor and hold it, the bow is too heavy: drop the draw weight before you change anything else.
One arrow hits the gold, the next sails high, and nothing felt different. 😅
Your anchor point is the spot your drawing hand touches on your face every shot, and on a bow without sights it is your rear sight: pick one spot, press into it firmly and never shoot short of it (the draw length guide shows how far that pull is). Do that and your groups stop stretching up and down. 💪
How an anchor point works: the rear sight you carry on your face
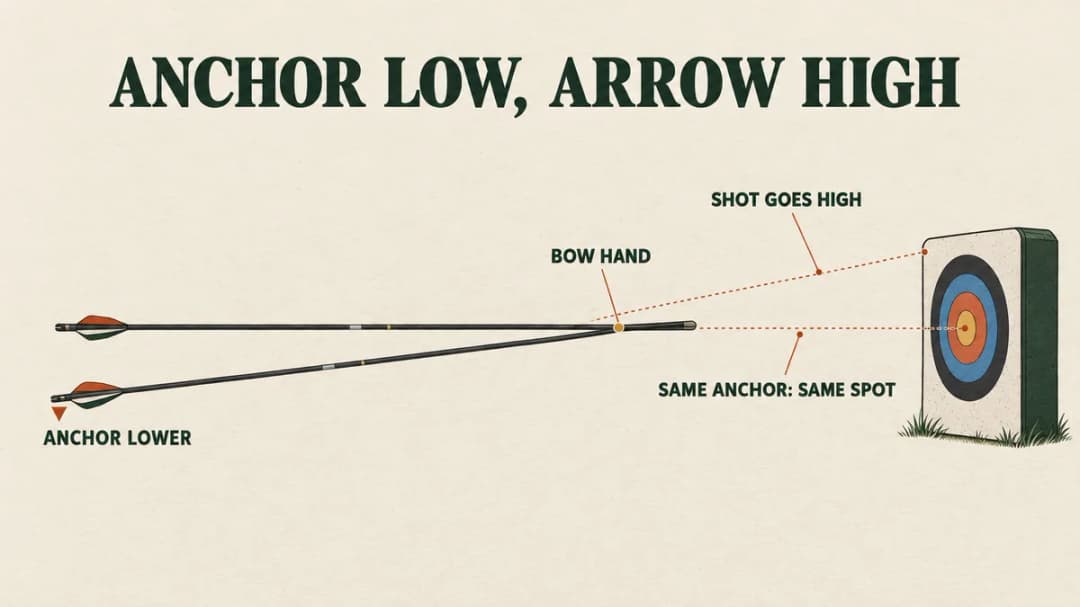
On a bow without sights, your eye, the arrow and your drawing hand line up to aim. The anchor is the fixed rear point of that line, the way the rear sight is on a rifle.
If your hand lands a little lower, the back of the arrow drops, the point tips up and the shot goes high. Move the anchor a quarter inch and the arrow lands somewhere new, which is why a drifting anchor shows up as a tall, stretched group.
Mine is simple:
My anchor point is I try to do my thumb knuckle to my cheek.
At first I couldn’t reach it reliably: I didn’t even know I was supposed to pull all the way back to my face. It comes with repetition, the same way the rest of your form does.

// Free printable
Get the range log I actually use.
Seventeen printable pages: session log, score tracker, a 30-day drill challenge, a bow maintenance card, a first-season checklist and more. Join the monthly email and it lands right away.
Choose your anchor point by bow and aiming style
The right anchor depends on how you aim, not on what looks pro. On a recurve or longbow without a sight, learn the corner of the mouth first: it puts the arrow close under your eye, which makes instinctive and gap aiming easier.
| Anchor | Where your hand sits | Best for | Second reference |
|---|---|---|---|
| Corner of the mouth | Index (or middle) finger touching the corner of the mouth | Barebow and traditional bows, beginners | String on the tip of the nose |
| Side of the face | Hand along the cheek, a knuckle on the cheekbone | Hunting and traditional shooting | A finger at the mouth corner |
| Under the chin | Top of the hand pressed under the jaw | Olympic recurve with a sight | String touching the chin and nose |
| Release on the jaw | Knuckle or release hand against the jawbone | Compound with a release aid | Peep sight, nose on the string |
Olympian Jake Kaminski, who shoots Olympic recurve, barebow and traditional bows, makes the point that matters more than which row you pick:
Where you put your hand on your face is not very important. As long as you put it in the same place every single time, you’ll have tight groups down range.
I agree, with one catch for beginners: pick your anchor once and stop shopping. Trying a new spot every session feels like progress, but every switch resets the muscle memory you were building.
How firm your anchor should be: solid beats gentle
A lot of beginners touch the face lightly, as if they’re afraid to push. A light touch lets the hand slide while you aim, and the arrow goes wherever the hand ended up.
Kaminski compares it to a boat’s anchor, and then gets specific:
So, you can anchor with your hand touching your face very gently, or you can anchor touching your hand to your face very firmly. The second is much better for two reasons. One is that it’s going to be more solid, and two is that it’s going to be less likely to move.
His tip in the video is to press until you feel bone on bone through the skin. Firm doesn’t mean tense: keep the hand pressed in while the fingers on the string stay relaxed, or your release suffers.
Add a second reference point to your anchor
One touch point can drift without you noticing. Two points that both have to be right make a drift easy to feel, and most good archers stack two or three.
- String on the nose: the string touching the tip of your nose is the easiest second check, and it costs nothing.
- String on the chin: standard for the under-the-chin anchor on a sighted recurve.
- A kisser button: a small disc on the string that touches the corner of your mouth; useful, but skip it until your anchor is already steady.
- Peep sight: standard on compounds; it forces your eye into the same spot every shot.
Kaminski uses the string as a reference on every bow he shoots:
When I shoot my Olympic style recurve, my string touches my chin and my nose in the same place in the same manner every single shot.
That’s the habit to copy. Start with the nose: it works for the corner-of-the-mouth anchor too, and it tells you right away if your head tipped.
How to make your anchor automatic in 5 steps
Build the anchor where the target can’t distract you. A blank bale (a big target with no face) at about 3 yards lets you feel every shot instead of chasing where it landed.
- Choose your spot from the table and your second reference, and check both in a mirror at full draw.
- Draw slowly and press into the same spot every time, feeling where the string and your hand rest.
- Hold for three seconds at anchor, long enough to take a breath, so you know you actually reached it.
- Shoot 20–30 arrows into the blank bale with your eyes on the bale, paying attention only to the anchor.
- Move back to 10 yards and a real target face, and shoot the same shot you just built.
Anchor problems and how to fix them
Most anchor trouble shows up on the target before you feel it. Read the group, then fix the cause in this table.
| What you see | Likely cause | Fix |
|---|---|---|
| Group stretched up and down | Anchor height changes from shot to shot | Add the nose reference and press in firmly |
| You release before your hand touches your face | Snap shooting, or a bow that’s too heavy | Hold three seconds at anchor; go lighter if you can’t |
| Hand slides forward before the release | Creeping: back muscles relax at full draw | Keep pulling through the shot; shorten your hold |
| Anchor feels different every session | Head tilting to meet the string | Bring the string to your face, not your face to the string |
The second row was me. The first time I tried to pull my 45 lb bow I got maybe three shots in, and I wasn’t reaching my cheek at all. If you can’t reach your anchor and hold it, the bow is too heavy, and no drill fixes that: the draw weight calculator gives you a lighter starting number.
// FAQ
Frequently asked questions
Quick answers to the questions readers ask most.
Where should a beginner anchor?
On a recurve or longbow without a sight, the index finger at the corner of the mouth is the easiest to learn and repeat. With a sight on a recurve, anchor under the chin.
Can I change my anchor point?
Yes, but do it on purpose, once, and practice it on a blank bale before you aim again. Switching anchors moves where your arrows land.
Why do my arrows go high when my anchor slips?
A lower anchor tips the arrow point up, so it flies higher. A higher anchor does the opposite.
Does my anchor change with distance?
No. Your aim changes with distance, your anchor never does; even string walkers move their fingers on the string, not their hand on the face.
Should I use a kisser button as a beginner?
Not at first. Get a steady anchor with the string on your nose, then add a kisser if you still see shots going high and low.
Final thoughts
Your anchor is the one part of aiming you control completely. Pick a spot, press into it, check it with your nose, and hold it before you let go.
Note your anchor in the free range log and check it whenever your groups open up.
